Wednesday, 27 June 2012

Mimosa So Lovely


Hi Everyone,

Hope your all having a great week. The image I have used today is a Bildmalarna Mimosa So Lovely and she sure is.


Don't forget that Copic Marker Europe have a blog hop going on and weekly prize draws from comments left and believe me the prizes are awesome inclusive Doohickeys from Magnolia, so don't miss out, start the hop HERE. There's also free digi's from both Krista of Saturated Canary and also Sylvia Vett of Wee Stamps.


Monday, 25 June 2012

A little Stroll

Hi Everyone,

I have a little scene for you today.  I have used the new Marianne Design Craftable House, I can see lots of uses for this, New Home, Christmas Scene with a christmas tree outside as well as a nice summer scene, like the one I have created for you today.


I cut the house out in a white and brown and you all the light brown sections were created by placing the die over the card and using distress inks and a blending tool swirled over the areas that I wanted to colour.


I have added a little bit of lace over the windows. The two children are ideal for this house.  They are both new Marianne Design dies, links at the bottom of the post.


This is me walking Ollie, lol.

Ingredients:-
Copic Markers

I would like to enter my card into the following challenges:-

Incy Wincy - Anything Goes
Love to create - Anything Goes
Corrosive - Summertime Girls
Crafting when we can - Summer fun
Great Impressions - Diecuts/Punches
Lets Ink It Up - Favourite Embellishments (flowers and diecuts)
Crafty Pad - More than one fold
Allsorts - Dies to die for
Hotshotcrafts - Distress inks
Charisma - Summer

Saturday, 23 June 2012

Cool and warm Greys

Hi Peeps,

It's my turn to do a tutorial on the Copic Marker Europe Blog and as I liked the Black and White look I created using cool greys and warm greys that I created a few weeks back I thought I'd show you how I achieved it.  I know there are many tutorials on how to colour black so not to bore you I have already coloured this section, but I thought I would just show you how I colour the face in black and white.

I have chosen the image Please Don't Let It Fly by Zindy Nielsen and we'll start colouring the face using C3, C1, C00.


Start with C3 and add your shadows where you think they will be.


Blend out using C1

And blend out again using C1 and I went one step further and blended to the lighter areas using C00

I then proceeded to follow the same process for all other skin areas


I then went back to the stubbly area on the Gentlemen and added some stippled C7 (dots) 

Now I start to colour the shirt using the Warm Greys.  I started with W3 and again outlined where I wanted my darker areas to be.  Google images of shirts and see how the folds are.

I then blended the W3 out with W1

And then blended the W1 out with W0.

When I had done this I wasn't entirely happy with the result so I went over it and repeated the steps using W5, W3, W1 and this is the result.


And here's my finished card.  I hope you like my vintage black and white and will give it a go.


Ingredients:-
Image Please Don't let It Fly by zindy Nielsen available from Crafts and Me
Paper is Marianne Design La Musique 6 x 6 paper pad
Frame created using the New Marianne Designs Creatables Frames 4
Postcard and Paris stamp are from Marianne Designs New Release  Stamp Sets
Pom Pom Trim by Marianne Designs

I would like to enter my card into the following challenges:-
2 Sisters - Anything Goes
Chocolate Coffee Cards - Coffee and Cream

Friday, 22 June 2012

Moving Shabby Chic Ferris Wheel


Hi Everyone, 

I am excited to reveal what I have been working on. So here is the great unveiling of my decorated Ferris Wheel.  I love altering and playing with paint and papers,  and I have so enjoyed decorating the Make It Crafty Ferris Wheel


I have decorated the main parts of the Ferris Wheel using a combination of papers and acrylic paint.  To do this I placed the chipboard piece that I wanted to cover in paper, onto my paper and drew around it with a pencil and cut out and stuck down using some strong glue.  All edges have been distressed using acrylic paint.

I have alternated each cart with lilac paper and then the next using the floral paper to give the wheel some contrast.
 
 I do love a bit of lace and flowers so you will notice that each cart has a lace canopy and again alternating flowers of purple and white on the canopy tops.  
 I added an arrangement of flowers and leaves to the base/entrance of the wheel and also added a fence.  Of course I want my Tilda's to be safe, lol.
   
 When I saw what our genius Boss had come up with the idea of little sitting Tilda's on a shabby chic Ferris Wheel was at the forefront on my mind, don't they look cute.    


Products used:- 
Papers by Magnolia and Maya
Mini Magnolia Tilda's
Acrylic White Paint
Lace
Flowers from Wild Orchid Crafts
Leaves are dies by Magnolia and Decorative Elegance By Marianne Designs


I hope I have inspired you to give this a go, it's beautiful as a gift or to keep in your Craft Room and if you turn the handle it goes around too.........

I would like to enter my Ferris Wheel into the following challenges:-

Midweek Magnolias - Anything but a card
Simon Says Stamp - Anything but a card
Bearly Mine - Flowers
Magnolia Stamp Lovers - Distress It
Just Magnolia - Summer Colours


Be back soon

Hugs Tracy x

Thursday, 21 June 2012

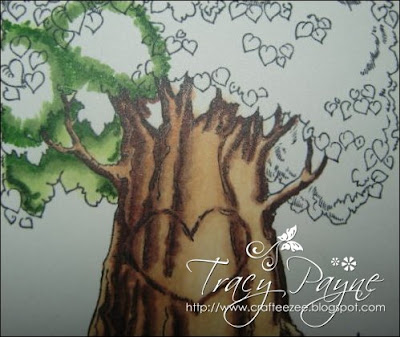
Colouring the Greenery of a Tree

Hi Copic Friends,

I'm back again with Part II of colouring a tree.  This time it is the greenery so the tree doesn't look flat.  If you missed part I, colouring the wood of a tree you can view it HERE.

I am using Copic Markers: YG67, YG63, G20 and G99

----------------------------------------------------------------

If I coloured this tree from the left to right using the 3 coloured markers, it would look really flat.  So let's bring the tree to life!

Start with your darkest marker, YG67

Your darkest areas will be those shadowed  by other leaves or branches. Blend out the YG67 with YG63.

 Then blend out the YG63 with G20.
 

As I did with the tree trunk, I am going to colour in sections.  I outlined some sections using G20 as a guideline.
 

Then I start my process again using YG67.  Do not worry about the leaves at this stage, I will be going back in with G99, a darker green to distinguish these.

Blend out using YG63.

And again using G20.

I have then gone back to the leaves using G99.

Then blended out the leaves using the G20.

I have gone back to those shadowed areas and added E25 and blended out with the G20.  I think this adds a bit of contrast to the greenery.

And this is the finished Tree.


Wednesday, 20 June 2012

Copic Marker Europe Birthday Blog Hop

Hi Peeps,

Today we have our first birthday at Copic Marker Europe and there's lots of seriously yummy prizes up for grabs, all the details are on the Copic Marker Europe Blog but I thought I'd share the prizes with you here too. 
Marianne Design 
HOLTZ OFFICE SUPPORT GmbH (Copic Markers)
Make It Crafty
Stampavie 
Diny's Kreatieve Produkties (Diny Sprakel)
Crafts and Me


Sylvia Zet from Wee stamps 
and 
Krista Smith from Saturated Canary

have both drawn gorgeous images especially for CM.


If you love these images and want to play send an email with your requestsWhen you receive the digi image of your choice from either Sylvia or Krista or both you will automatically commit yourself to join in the CME Contest. You have to make a card with one of the digis and pop your entry into Mr Linky on the main Copic Marker Europe Blog

The winner will receive a Copic Sketch set EX6 12 New Colours 2012. 
(Sponsored by Diny's Kreatieve Produkties.)

You will have until July 25th to complete your entry.

Now if you want to be in with a chance of winning the Copic Carrying Case you need to leave a comment on all of the DT posts below and become a follower of the CME Blog.


Now didn't I tell you there would be lots of awesome prizes!


Here's the full hop list in case you get lost

Penni
DeeDee
Kathrin
Keren
Hanne
Tracy (you are here)
Jing
Copic Marker Europe


That was alot to take in I know, but I wanted you all to know just what awesome prizes we have up for grabs.  So if your still with me, here's the card I made using the special Digi Krista made for us:-


She's a darling, but then aren't they all. I would of loved to of had time to use Sylvia's image too but with cycling 54 miles on Sunday I have been recouperating, but I look forward to seeing what you all come up with.

Ingredients:-
Paper
Marianne Design Decorative Elegance
Marianne Designs Creatables Anjas Leaves 1 and 2
Marianne Designs NEW Frames 4
Flowers from WOC
Twine from Ribbon Girls
Quickutz Corner Die
Flat Backed Pearls

Have fun on the hop!

I'd like to enter my card into the following challenges:-
DivasbyDesign - Diecuts
Papertake weekly - Bingo (Diecut, Free((flowers)), Glitter)
Try it on Tuesday - Anything Goes
Daisy Doodles - Anything Goes
Lollipop - Flowers

Monday, 18 June 2012

I Did It

Hiya Peeps,

Well I've done it.  I'm totally shattered but I did it..... Yep 54 miles from London to Brighton on my bike at 06:00 yesterday.  It took me a total of 6 hours but this was with stops and I had problems with my gears, it wouldn't go into the top gear.  Hubby tried to fix it but in the end we had to pop into one of the stations for them to adjust it, twice.  Time in the saddle was 5 hours 20 mins and I'm pretty pleased with that. The internet says the average is 7, so I'm even more pleased with my achievement. I'm a little saddle sore, but apart from that mainly tired as it was a real long day.  We was up at 3:30 am and I didn't get home until 8pm.  So we had a takeaway pizza and then I was tucked up by 9pm, but awake again by 3:50 am, totally wasn't expecting that, so I am still tired today so will be grabbing another earlyish night.

The streets were lined with well wishers and words of encouragement and I thought the whole event was very well organised.  Residents lines the streets and had little tables of water and lollies and the welcome along the Finish Line on the Promenade was certainly emotional to say the least.  I am very proud of myself and for Hubby waiting for me up those hills, I was a little slower than him, but we crossed that finish line together.

Thank you to each and every one of you who sponsored me.  My Just Giving page remains open for another 3 months so as they say it's never too late.

http://www.justgiving.com/Tracy-Payne0

I do actually have a card to show you.  I posted it on the BunnyZoe site prior to my ride but forgot to post it here, you know pre-ride nerves and all, lol.

The stamp I have used is by Whimsy and is called "Summer Garden & Accessories" and don't forget that BunnyZoe have a sale on right now.  This image comes with lots of handy sentiments and  I have used a combination of distress inks and the new distress marker pens, I really love these.

The photography doesn't do this card justice I'm sorry to say.


Ingredients:-
Image "Summer Garden & Accessories" by Whimsy Stamps
Marianne Design Frames 4 - Nikki has this on order so keep an eye out

Monday, 11 June 2012

Two Cuties

Hi Peeps,

Hope you are all well.  This was my last training weekend and we did 22 miles on Saturday on my new bike, 4.5 miles of walking with the dog yesterday morning and then I did a quick 10 miles on my bike seeing as Hubby put my road tyres on and adjusted my saddle.  All in all a few calories burned but my body now needs to rest before the big day on Sunday.  I did have a little accident, I can hear you laughing.  Well I'm used to a mountain bike and not the skinny racing tyres so when Hubby shouted to me to turn right into the pub for a drink, I did as I normally did but as soon as I hit the entrance, which was gravelly, I skidded and came off my bike.  My shin's and elbow are cut and bruised not to mention swollen, OMG, and I cut my hand through gloves. Lesson learned, beware of gravelly areas on road tyres or not go to the pub, ummmmmmmmm.

If there's anyone out there who still hasn't sponsored me, there's still time, here's the link:-


Right, onto a couple of cards.  Today is challenge day at BunnyZoe with the theme set by Maria of Girls, Girls,Girls. I came up with this little cutie pie.

Isn't she cute. I have coloured her with distress re-inkers and markers.  The text comes with the stamp.  I have stamped it onto accetate but I only had brown and I think it would of  been easier to photograph if I had used black, so just in case you can't see it well the top reads "a giggle a Curl...." and the bottom, "a sweet little girl"


Martha Stewart Branch Punch
MIC circular frame coated in acrylic paint
Carnations from Wild Orchid Crafts

I would like to enter my card into the following challenges:-
Wild Orchid Crafts - Anything Goes
Sir Stamp Alot - Bingo (lilac/purple, polka dots and bling)


I have just realised that I haven't posted my DT card for Crafts and Me, seriously I don't know where my brain is, I blame it on the flu and training....... without further ado here it is


The theme chosen by me is Lace.  

Ingredients:-
Marianne Design Ribbon Roses
Maja papers

I would like to enter my card into the following challenges:-

Ribbon Girls - Ribbon or Lace
Crafty Catz - Summer Time


Have a good day.