
If your looking for the coming Zoe from Make It Crafty and Mo from Mo's Digital Pencil scroll down one or click HERE.
Wow do I have a sweet treat for you today, and the best of it is it's calorie freeeeeeeeee! Whilst attending the craft show at Alexandra Palace recently with my sister and niece we saw one of these cupcakes and my sister said, you could make one of these. Enough said, so for my tutorial on the simply sassy blog today I thought I'd show you, and I might add this is the first time I have made one, lol, how to make the cupcake and what better image to add to the box than the Witch's Cauldron as she is making a special calorie free cupcake brew, lol. We all need one of these and this one I am giving to my Sister for her birthday on Saturday, her lounge is black and white, so this will fit in perfectly!
Well, it's a long post so grab a cofee and off we go............ You will need some strong card, I used the back of a cereal box, normal cardstock, papers, glue, a polystyrene ball, and whatever you want to use to decorate it, ribbon, flowers, stickles, glamour dust, perfect pearls, and accetate if you want to make the box. It's really up to you.
This is what we are going to make:-

This is what you will need:-

Strong cardstock for your base (I used a cereal box)
Paper for the cupcake case, 2 x 12" strips
Ribbon x two colours x 1 metre each or thereabouts
I polystyrene ball
Glue
Elastic Band
Scissors
Accetate x 4 pieces 12.5 x
Cardstock and Punchfor the box
Decoration: flowers, perfect pearls, ribbon, lace, whatever you fancy
Your choice of image, mine is Witches Cauldron by Simply Sassy available HERE
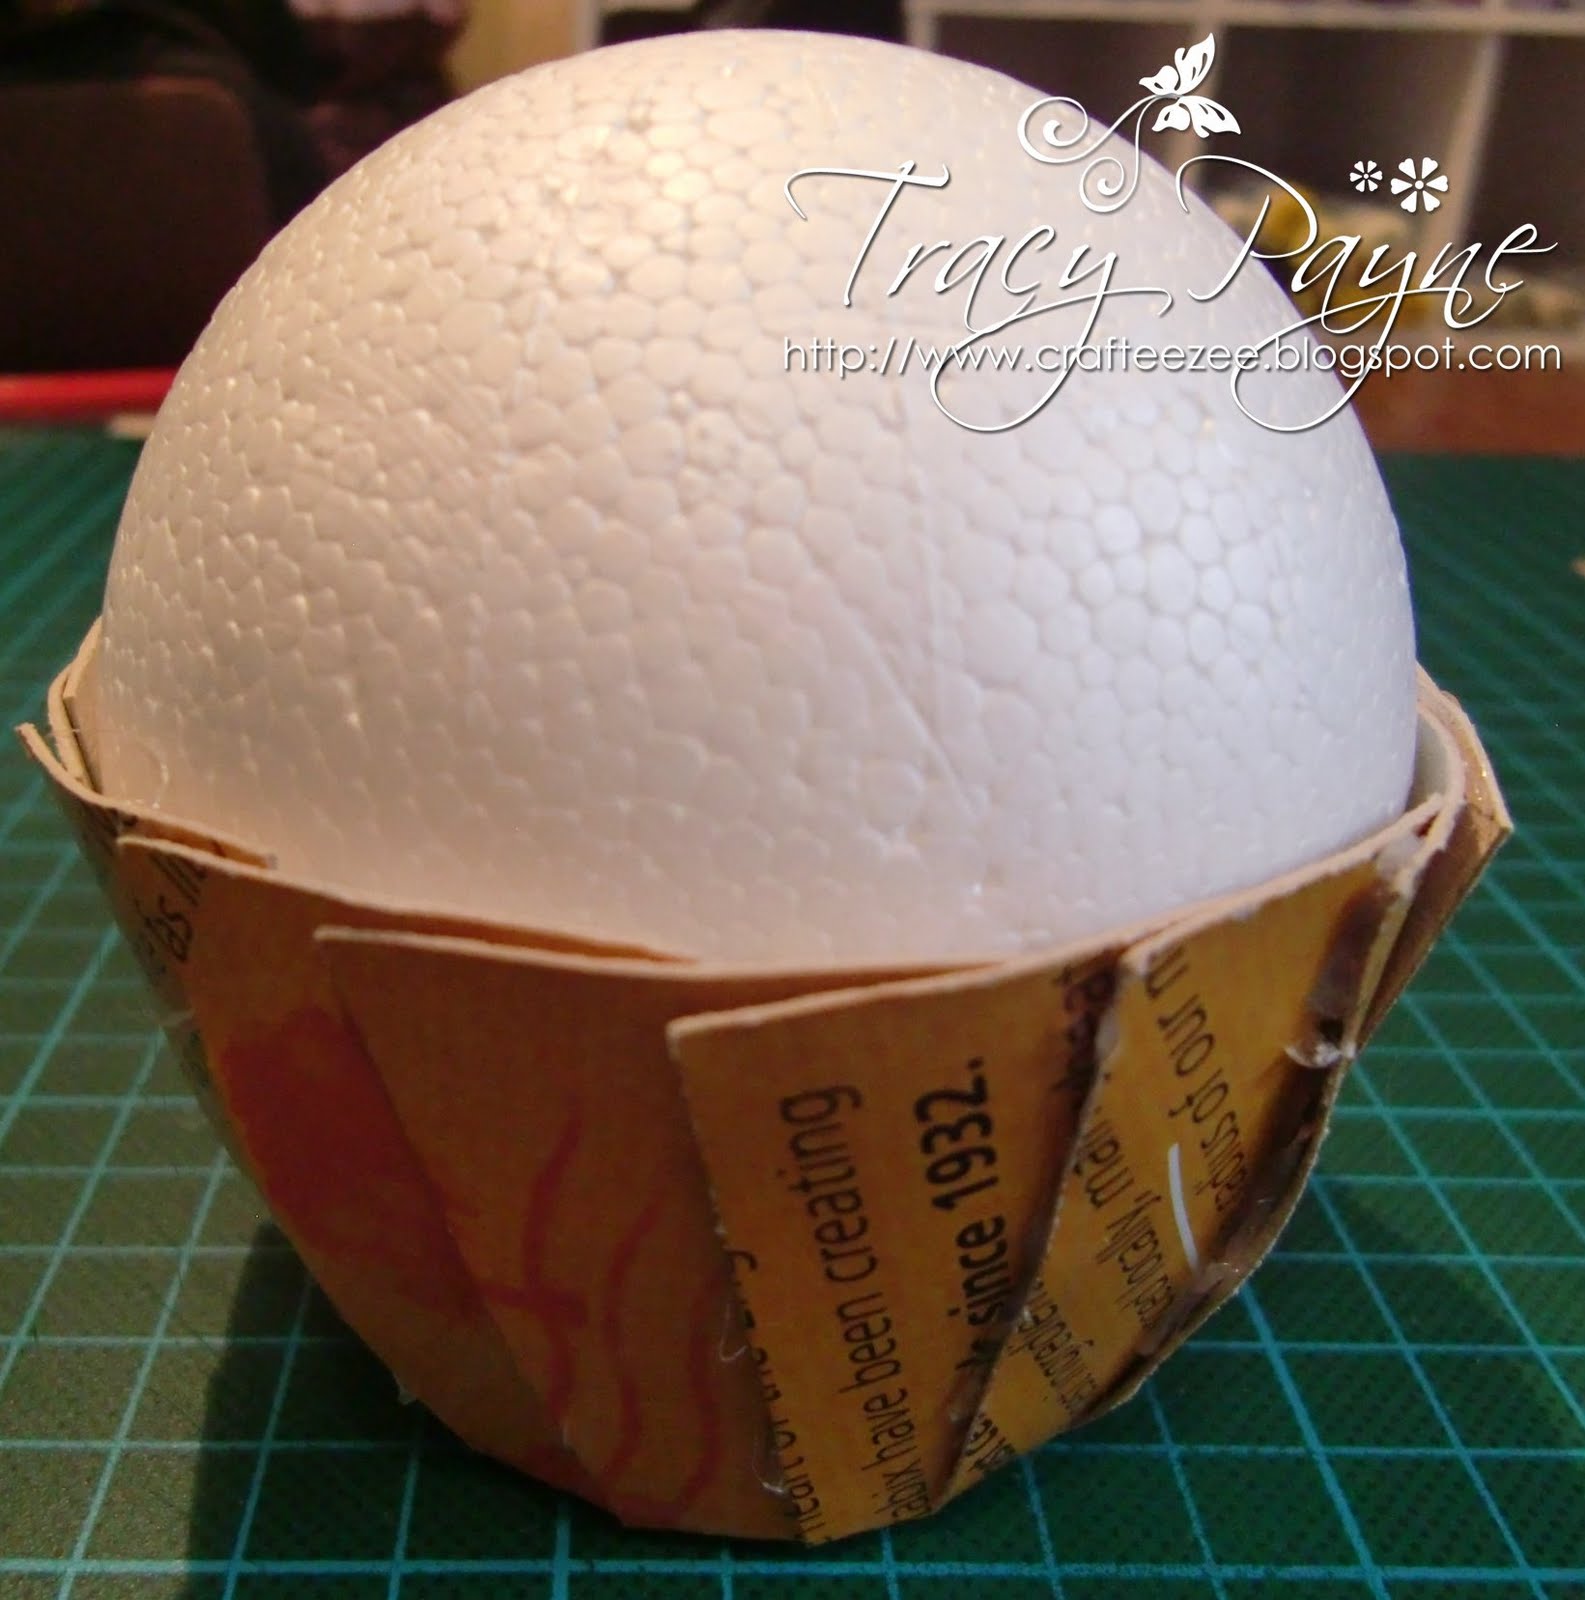
First cut a 6 inch circle out of your strong cardstock (this is my cereal box). Mark out a 2 inch circle in the middle and then mark out 16 even wedges.

Cut each wedge up to the outside of the 2 inch circle.

Place the ball inside the cupcake. Put an elastic band around it and glue the flaps. I used a hot glue gun but any glue will suffice, you'll just have to be patient and let it dry.

This is how it should look. Then glue your ball into the bottom of the cup.
If you are using 12 x 12 paper, cut two two inch strips. I used digital paper printed 6 x 6, so I cut 4. Then glue all the ends to together and make a circle.
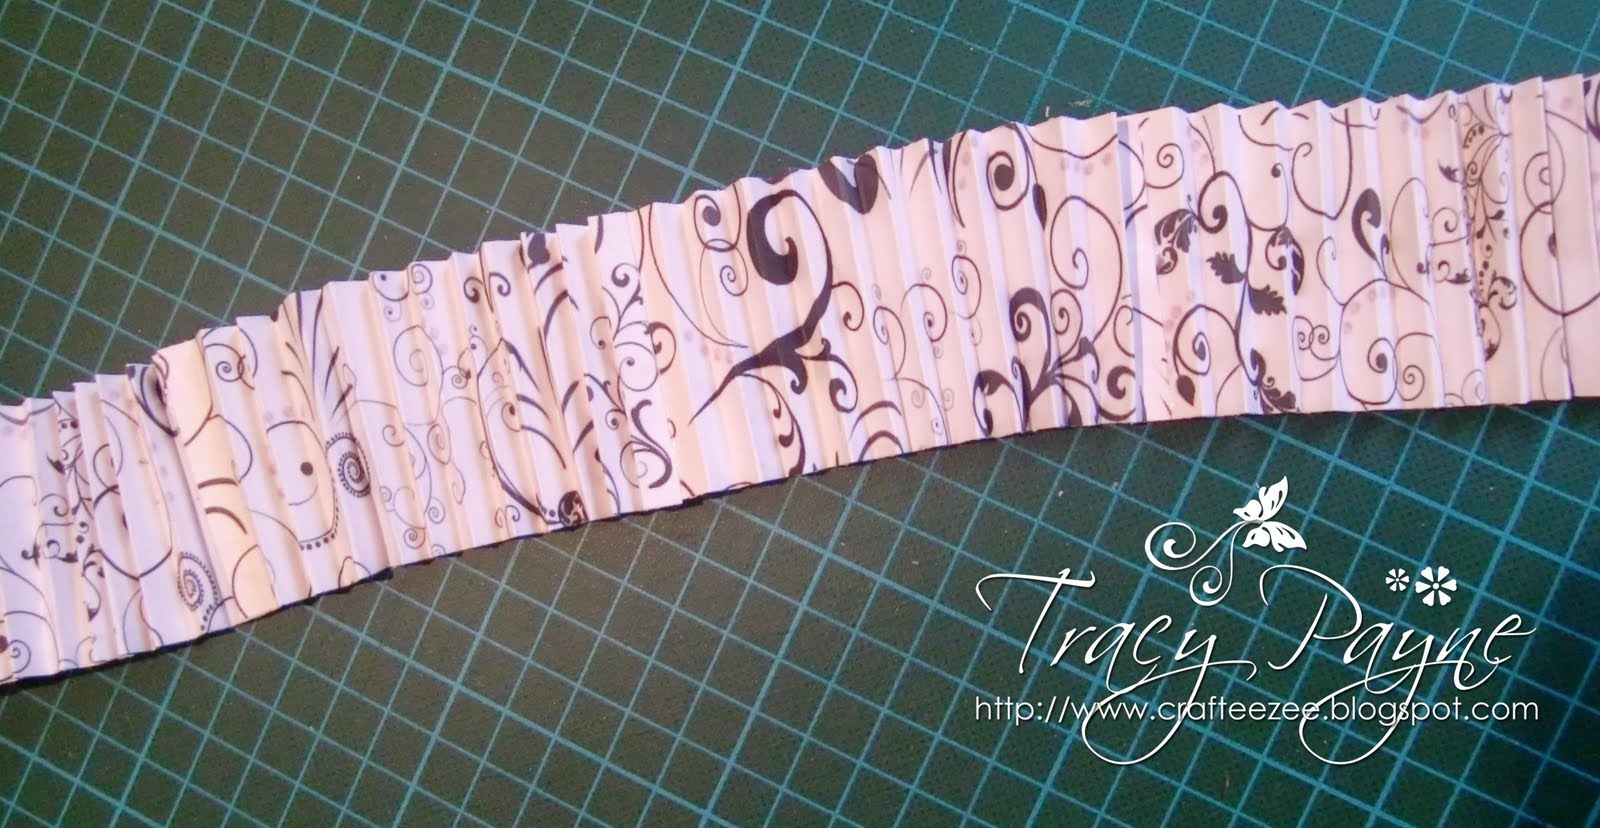
It should look like this.

Cup around your cupcake base and glue at the top and at the bottom.

Cut out a circle big enough to cover the bottom and stick down. I traced around my glue bottle.

Now onto the decoration. You can ruffle your ribbon two ways. Loosen the threads at the bottom and pick out a couple of threads from the middle section and pull.
Secondly, do a running stitch down the middle of the ribbon and when you get to the end pull the thread and ruffle the ribbon and secure.

This is your icing. Now time to decorate.

A layer of lace and then white icing.

I airbrushed a few flowers to make them black.

Another layer of black icing.

I then added some liquid pearls, glamour dust and for the black cherry, I rolled up some airdray clay, painted it white with some acrylic paint and then airbrushed it black and add some more glamour dust as all cupcakes need a sprinkling of sparkly stuff don't they.

If you want to make a box, then read on.
You need to cut two squares of 7 x 7 cardstock and score 1 inch each side. Then cut out the triangles marked with the dashes.

Glue the edges to the inside of the box.

Once you have two completed. You will need 4 sheets of accetate, 12.5 cm by 15.5cm

I cut 4 x 1.75 inch strips of cardstock and and punched both sides. You will need a total of 4 x 15.5" in length pieces. I then scored them down the middle.

Glue the accetate pieces to the punched edges as shown below.

Then place inside the cardstock base and glue all the way round.

Pop the lid on and decorate as required. Note I didn't glue the lid down so that you can take the cupcake out and whilst it lives inside the box it remains dust free.

And it wouln't be complete without your image. Here is the Simply Sassy Witches Cauldron. Hasn't she done well brewing up her snazzy black and white cupcake.


Here's a picture of the lid.


Hope you've enjoyed the tutorial.
Challenges:-
ABC Challenge - S for Sparkle (lots of glamour dust on my cake)
Creative Craft World - Recyle something (cereal box)
Freshly Brewed - Sparkle and Shine
My Mum's craft shop - glitter
Your next stamp - texture
A spoonful of sugar - Celebration (this is for my sister's birthday on Saturday)
Ladybug Crafts - Anything Goes
Top Tip Tuesday - Open
Tuesday Throwdown - something recyled (cereal box)
Critter Sketch - Use two different punches/dies
Cupcake Craft - Layers
Stamp with fun - birthday
Cupcake Inspirations - Photo
Paper Sundaes - Texture
33 comments:
This is uber amazing Tracy! Brilliant! Hugs, Lesley
Wow!Just stunning!! Want to go make one now. julie x
This is a beauty Tracy - I love the reality of it & the aptness of the black & white symbolism - good v. evil. Here's my wicked sense of humour -you could give this to a dieting friend instead of an Easter Egg!! The way the white & ivory colours work together really make you think of whipped cream & your decoration of the box is superb. As for the shading on the image - I love the roundness of that cauldron.
Hope you got some sleep after your late nights.
Paula (PEP)
Wow Tracy, that looks awesome loving the icing, just the sort of cupcake I love.
Might just have to give this a go.
Hugs Beccy x
OMG ! It's just fantastic, i have no words !!! Wow wow wow !
xxx
Thanks for the very nice tutorial. Your blog has always such cute stuff.
Hi Tracy fabulous tutorial will have to give it a go, your whole project is stunning. with hugs Shirleyxxx
Wow Tracy this is amazing and just loving your colours!!
Thanks for sharing both tutorials Love Chanelle xxx
Gorgeous work, I love all the layers. Thanks for joining us this week at CCC.
Liza x
Such an incredible project hun!! WOW!! Thanks so much for the lovely tut!! :)
Wow Tracy what a fabulous project! It looks amazing! Thanks for joining us at LCI this week, hope to see you again soon. Pami x
Wau-aivan mahtava teos--kaunis ja isotoinen--
Kiitos osallistumisesta ABC-haasteeseen tällä viikolla
Onnea arvontaan
Oikein ihanaa ja Rauhallista Pääsiäistä sinulle!
your such a show off ya know !!! lol
Stunning Tracy, it's really pretty and I'm betting your sister will be thrilled to bits with it.
Another tut to add to my never ending 'must try this' list
Anne x
Adorable! Great job with punches! Thanks for playing in the Critter Sketch Challenge.
OMG what an amazing project. That cupcake is yummy and the packaging you created for it with that adorable witch is fabulous! Beautiful work Tracy! hugs, Angela
what a fabulous project - and thanks so much for the tutorial
Love the monochrome look
Thanks for joining us at LCI this week
Lisa x
what a gorgeous project Tracy, love the black and white! have a wonderful easter ♥
Oh my goodness girl!! This is amazing!!! Just LOVE your sweet, elegant cupcake!!! Thanks for joining us at The Cupcake Craft Challenge this week! Good luck! Hugs & Sunshine! /Sari
This is amazing Tracy! I always wondered how people make these - and now I can finally try my own. Thanks so much for sharing this!
Big hugs,
Kathrin aka Kruemel
Wow this is stunning and thank you for posting the tutorial too i will have to find some time to have a go!
Thanks for playing along with our All That Glitters Challenge at MMCS and hope to see you again soon!
Kitty xx
Amazing project, the cup cake looks yummy.
Thankyou for joining us at Try it on Tuesdays.
Goodness... what an intricate creation!! Very impressive!! So glad you could join us this week at CIC! Hope you can make it this next week also! THANKS!
Denise
Hi Tracy and what an amazing projrct, love it,thankyou for joining us at Cupcake this week.
Louise xx
Wow, Now I want a Cupcake! :) Thanks for playing along with at Cupcake Inspirations this week!!!
Really cute and I love the tutorial. Thanks for sharing!
I wish I could say anything remotely as fancy gets made in this house,lol.
I'd be lying though. Before easter I whipped together a quick basket for my girl - the boy had made one is preschool - yippeeeee!!! lol
Hugs
Annika
fabulosity! GREAT project & tutorial :) Thank you so much for sharing your card creation with us at ABC Challenges! Hope you'll join us again next time! Hugs~
OMG....Tracy this is amazing. I made a muffin for my boyfriends a long time ago too. It´s so much work! Love it! Janine
Wowwwwwwwww Tracy this is totally fantastic, what a stunning creation and tutorial, you are super talented I love, love love it.
Hugs
Lorraine x
What a fun project! Thanks for the tutorial and great pictures!
Thank you so much for playing along with us at Freshly Brewed Challenges Sparkle and Shine challenge!
Heather Dennis
Fresh Brewed Designs
John 3:16
This is good enough to eat,yum yum!! absolutely stunning im quite speechless. well done huni amazing!!!! xxx
Wowwww. It's stunning! Love it :)
Karin
Wowwww! It's stunning!
Love it :)
Karin
Post a Comment