Showing posts with label Simply Sassy. Show all posts

Monday, 22 August 2011

My Last Post for Simply Sassy

Hiya Peeps,

Sadly this is my last post on the Simply Sassy site.  I hope I have brought inspiration to you all over the last 8 months.   I've enjoyed my time working with the Sassy's and of course Maria and the Girls have all been fab and we will be staying friends and also teamies, as I am on a couple of DT's with Maria and Kathrin.

I have inked up one of my favourites and an oldie in the Sassy range, Fashionista, isn't she fabulous.


You can find Fashionista at Funky Kits HERE


Ingredients:-

Image Fashionista by Sugar Nellie at Funky Kits
Papers by Pion (gorgeous)
Medium - Copics
Stempleglede Grunge Stamp
Lasercut Chipboard Flourishes and side panel from Make It Crafty
Tim Holtz Ticket, Pearls and Lace from stash
Tea Dye and Vintage Photo Distress Inks 
Magnolia Doohickey Die

I'd like to enter my card into the following challenges:-

The Sugar Bowl - Sketch 
Paper Playtime - Anything Goes 
StampsRUs - Anything Goes 
Corrosive - Girly 
Designed To Delight - Anything Goes 


Monday, 18 July 2011

Simply Sassy Sneek Peek Apple of my Eye

Morning Peeps,

Where does the weekend go.  Seriously you blink and you miss it.  I did manage to do an hour in the gymn on Saturday, goodness knows what's come over me and yesterday I visited my niece and the new addition to the family, baby Nikita.  She's gorgeous, so now I'm a Great Aunt!

I also had a little accident with acrylic paint, oh my word.  I only needed a little for the project so I unscrewed the lid. Biggggggg mistake.  I knocked the bottle off the table and it landed upright.  Good you may think. Notttt. It hit the floor with such speed that the contents splurted up and covered me, my sewing machine, printer, radiator and the carpet. Opps!  As i woke up early I just put on my hubbys T-shirt and my linen trousers and went to my craftroom whilst everyone was still sleeping, so my hubby's black Firetrap T-shirt now has splatters of white paint all over it. I was so lucky it didn't splatter the cards I had on the side, typical crafter more worried about my cards than OH's T-shirt. Who would of thought there was that much in a bottle, lol.  My hair still has white streaks, lol.

I have a little sneek peek for you. This is Apple of my Eye and will be available on Saturday from Funky Kits.


Ingredients:-

Image "Apple of my Eye" Funky Kits from Sat 23rd July
Pion Papers
Lasercut Chipboards leaves, corners, flower centre in ribbon by Make It Crafty/Quixotic Paperie
Acrylic Paint
Martha Stewart border punch
Magnolia Butterfly Die
Magnolia fence die
Sentiment is Whimsey
Bling, ribbon and flowers from stash

I'd like to enter my card into the following challenges:-
CLP- Sketch
Stamps R Us - Through the garden gate
Dream Valley - Summer
One stitch at a time - Flowers
Scrappyfrog - Summer Flowers
Fussy and Fancy - Summer
Simon Says - Anything Goes 

Monday, 4 July 2011

Christmas in July

Morning Peeps,

Hope you all had a fab weekend.  I had to go shopping to Tesco on a Saturday afternoon, all I can say is never again!  I hate shopping at the best of times. Yesterday me and OH went out on our bikes, a gentle 6 mile ride..... NOT.  Hubby's idea of short cuts again, up steep hills, sharp left and up a vertical rock hard mud  hill, so much so I nearly fell off me bike, well actually nearly a couple of times.  We were going up a one way street so had to go on the path and got stuck behind two people so I came to an abrupt stop and as I can't quite touch the ground with my feet I nearly fell into the road, lol.  Anyways, 355 calories burnt off so it had its plus points.

Anyways, are you guys having problems with Blogger, I can't leave comments, sometimes my page is all over the place.  I usually swtich browser but it seems to be a problem on both that I use. Grrrrrr.

Today's card is for the Simply Sassy Inspiration Blog and I have used All Wrapped Up available HERE.


Ingredients:-

Image by Sugar Nellie "All Wrapped Up" available from Funky Kits HERE 
Medium - Copics 
Snowflakes and corners are lasercut chipboard pieces available from Make It Crafty and Quixotic Paperie
Martha Stewart Branch Punch
Puff Paint heated to create snow
Magnolia Doohickey Die

I'd like to enter my card into the following challenges:-

Allsorts - Free & Easy
Catch the bug - Anything Goes 
Ellephantastic - Celebrations 
Our Creative Corner - 4th of July or christmas in july 
The Artistic Stamper - Hot colours 
Bling it on - Anything Goes 
Card & Scrap - Punches/Dies (Christmas Tree is made using Branch punch) 
Cupcake craftroom - Polka dots (Top and bow) 
The Stampsmith - Christmas 
Winter Wonderland - Pick 3: patterned paper, 1 charm, ribbon, snowflakes, buttons, gemstones, brads. 
For Fun - Christmas 


Thursday, 21 April 2011

Brewing a Treat, Cupcake Tutorial

Morning Peeps,

If your looking for the coming Zoe from Make It Crafty and Mo from Mo's Digital Pencil scroll down one or click HERE.

Wow do I have a sweet treat for you today, and the best of it is it's calorie freeeeeeeeee! Whilst attending the craft show at Alexandra Palace recently with my sister and niece  we saw one of these cupcakes and my sister said, you could make one of these. Enough said, so for my tutorial on the simply sassy blog today I thought I'd show you, and I might add this is the first time I have made one, lol, how to make the cupcake and what better image to add to the box than the Witch's Cauldron as she is making a special calorie free cupcake brew, lol.  We all need one of these and this one I am giving to my Sister for her birthday on Saturday, her lounge is black and white, so this will fit in perfectly!

Well, it's a long post so grab a cofee and off we go............ You will need some strong card, I used the back of a cereal box, normal cardstock, papers, glue, a polystyrene ball, and whatever you want to use to decorate it, ribbon, flowers, stickles, glamour dust, perfect pearls, and accetate if you want to make the box. It's really up to you.

This is what we are going to make:-


This is what you will need:-

Strong cardstock for your base (I used a cereal box)
Paper for the cupcake case, 2 x 12" strips
Ribbon x two colours x 1 metre each or thereabouts
I polystyrene ball
Glue 
Elastic Band
Scissors 
Accetate x 4 pieces 12.5 x 
Cardstock and Punchfor the box 
Decoration: flowers, perfect pearls, ribbon, lace, whatever you fancy
Your choice of image, mine is Witches Cauldron by Simply Sassy available HERE


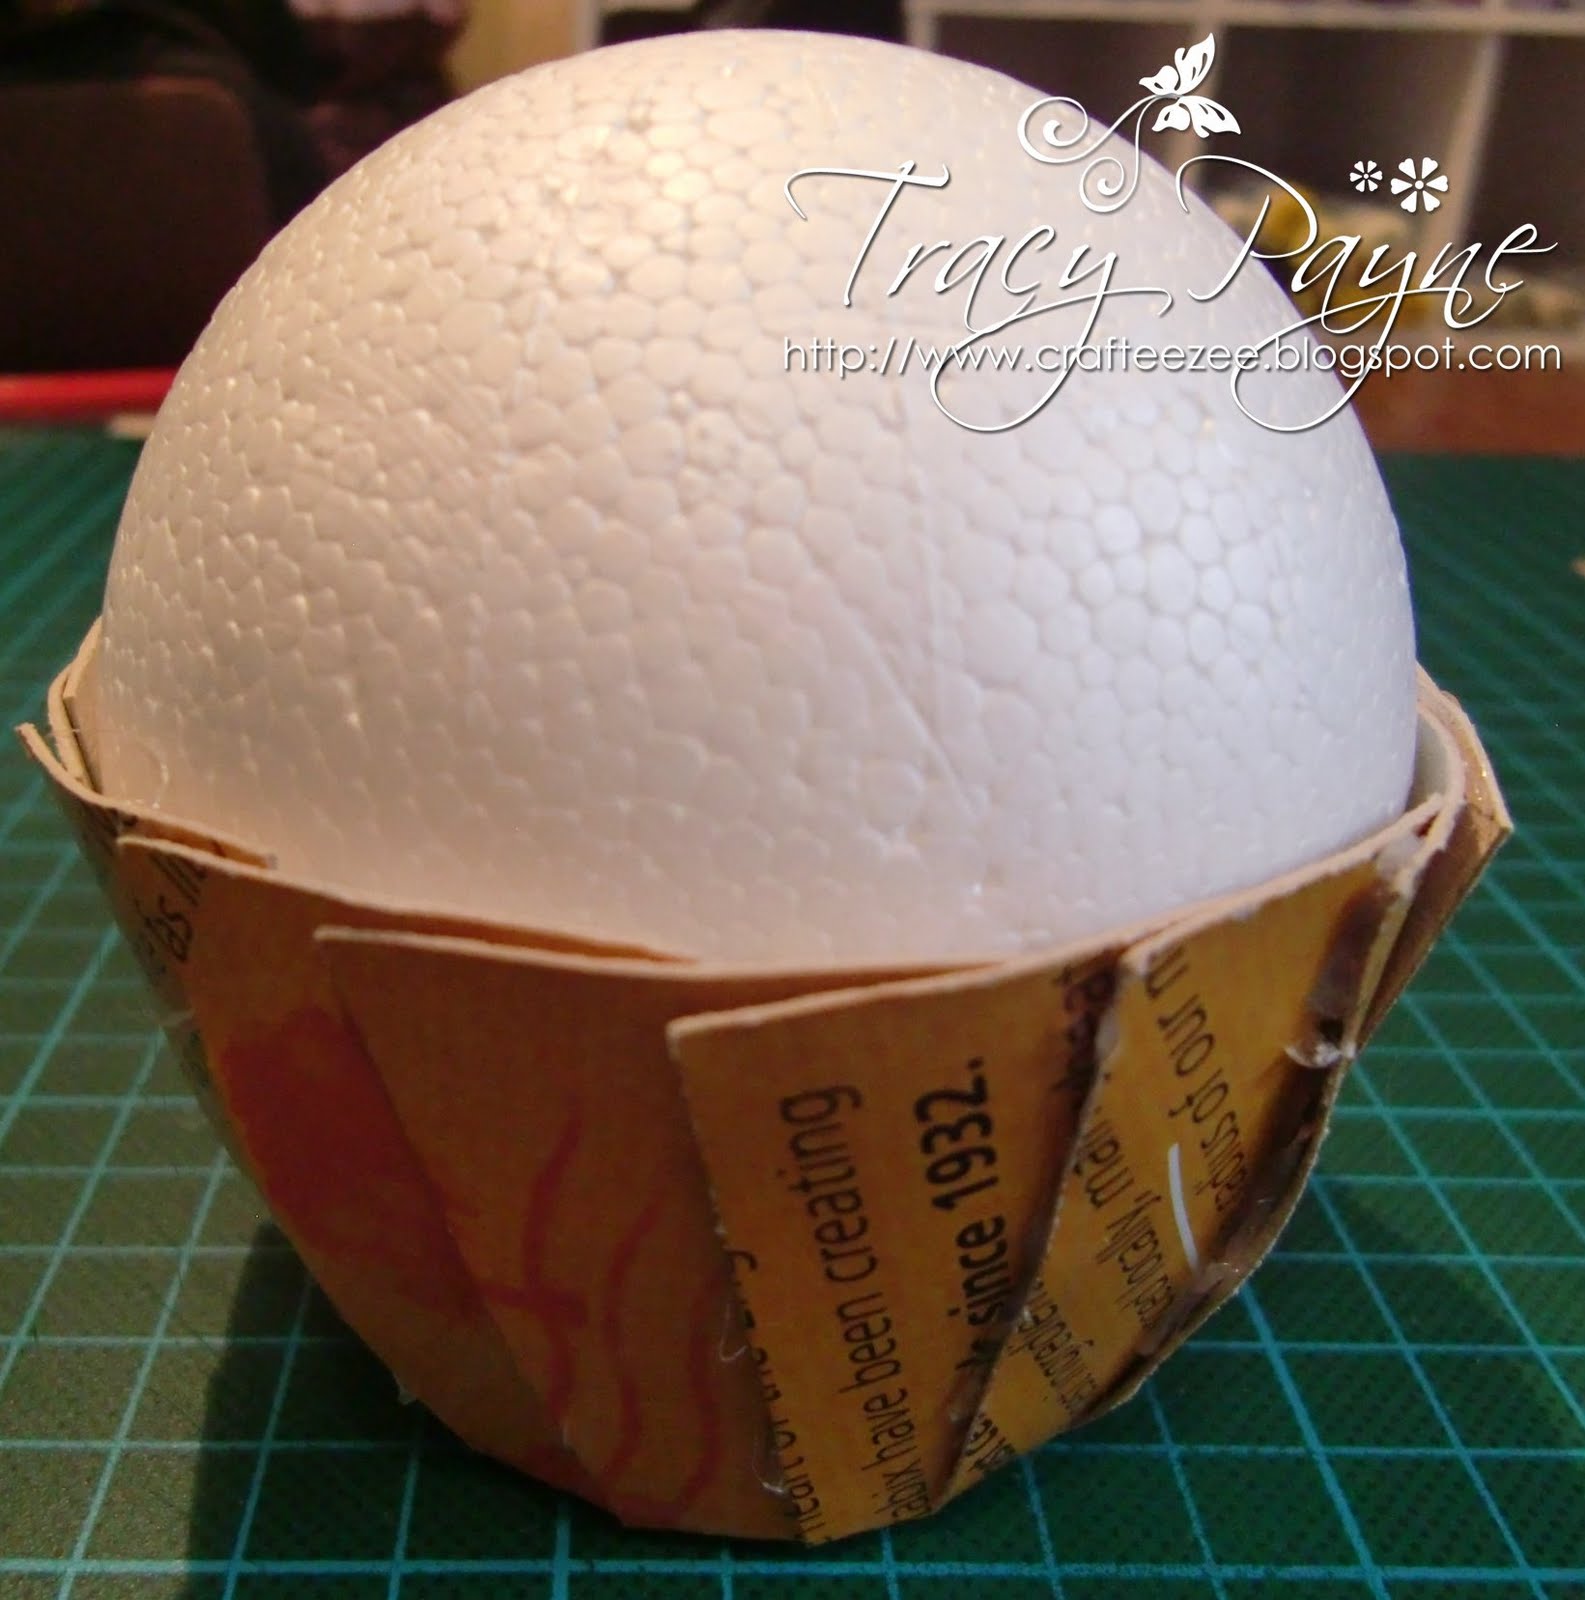
First cut a 6 inch circle out of your strong cardstock (this is my cereal box).  Mark out a 2 inch circle in the middle and then mark out 16 even wedges.

Cut each wedge up to the outside of the 2 inch circle.

Place the ball inside the cupcake.  Put an elastic band around it and glue the flaps.  I used a hot glue gun but any glue will suffice, you'll just have to be patient and let it dry.

This is how it should look. Then glue your ball into the bottom of the cup.

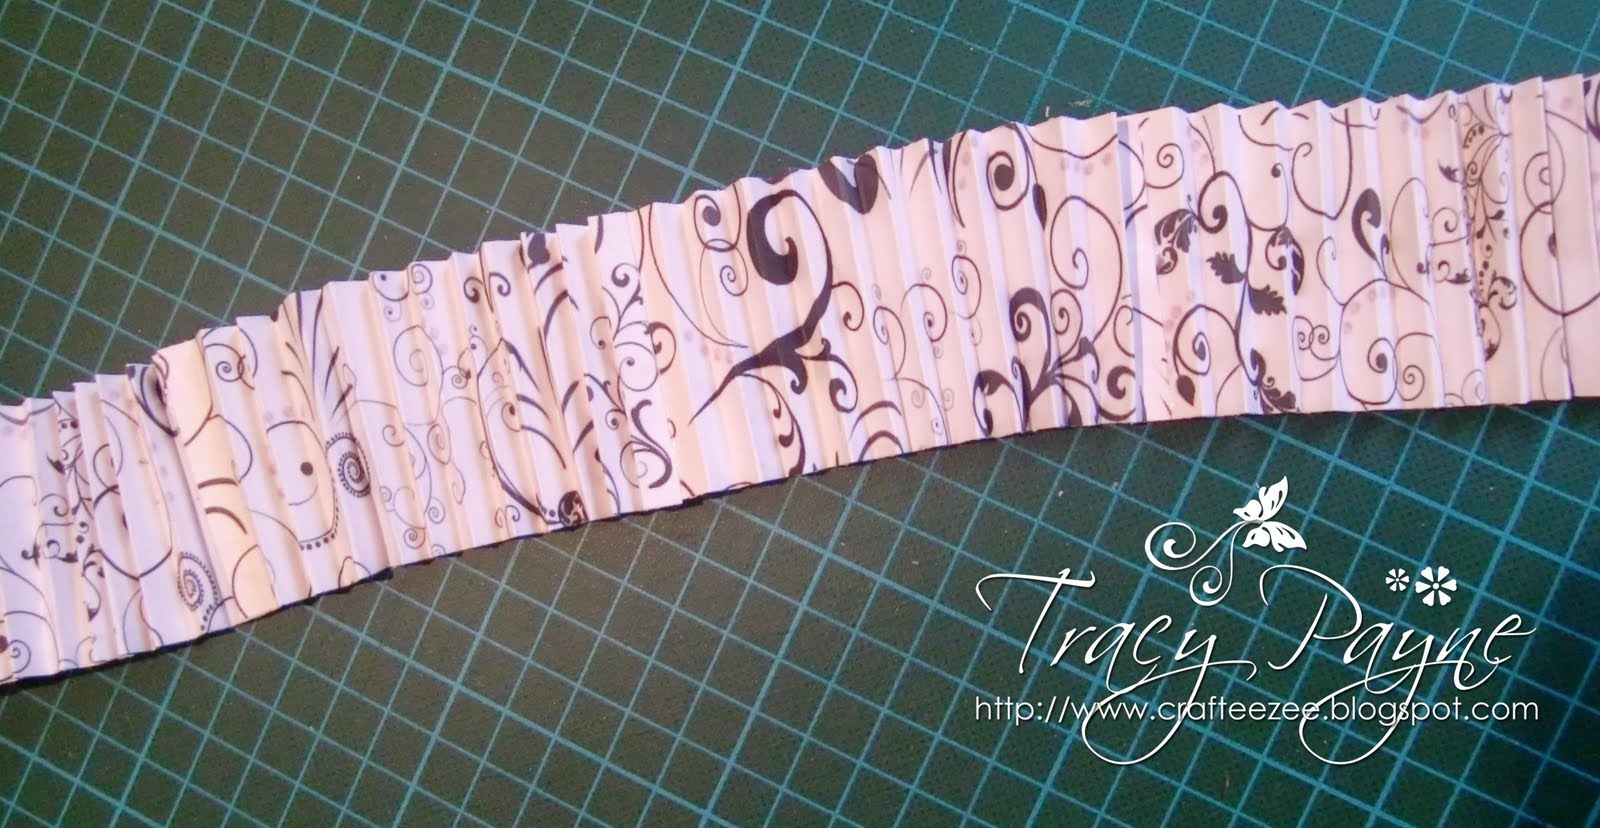
If you are using 12 x 12 paper, cut two two inch strips.  I used digital paper printed 6 x 6, so I cut 4.  Then glue all the ends to together and make a circle.

It should look like this.

Cup around your cupcake base and glue at the top and at the bottom.

Cut out a circle big enough to cover the bottom and stick down.  I traced around my glue bottle.

Now onto the decoration.  You can ruffle your ribbon two ways.  Loosen the threads at the bottom and pick out a couple of threads from the middle section and pull.
Secondly, do a running stitch down the middle of the ribbon and when you get to the end pull the thread and ruffle the ribbon and secure.

This is your icing.  Now time to decorate.

A layer of lace and then white icing.

I airbrushed a few flowers to make them black.

Another layer of black icing.

I then added some liquid pearls, glamour dust and for the black cherry, I rolled up some airdray clay, painted it white with some acrylic paint and then airbrushed it black and add some more glamour dust as all cupcakes need a sprinkling of sparkly stuff don't they.


If you want to make a box, then read on.
You need to cut two squares of 7 x 7 cardstock and score 1 inch each side. Then cut out the triangles marked with the dashes.

Glue the edges to the inside of the box.

Once you have two completed.  You will need 4 sheets of accetate, 12.5 cm by 15.5cm


I cut 4 x 1.75  inch strips of cardstock and and punched both sides.  You will need a total of 4 x 15.5" in length pieces. I then scored them down the middle.

Glue the accetate pieces to the punched edges as shown below.

Then place inside the cardstock base and glue all the way round.

Pop the lid on and decorate as required. Note I didn't glue the lid down so that you can take the cupcake out and whilst it lives inside the box it remains dust free.

And it wouln't be complete without your image.  Here is the Simply Sassy Witches Cauldron.  Hasn't she done well brewing up her snazzy black and white cupcake.


Here's a picture of the lid.


Hope you've enjoyed the tutorial.

Challenges:-

ABC Challenge - S for Sparkle (lots of glamour dust on my cake)
Creative Craft World - Recyle something (cereal box)
Freshly Brewed - Sparkle and Shine
Your next stamp - texture
A spoonful of sugar - Celebration (this is for my sister's birthday on Saturday)
Ladybug Crafts - Anything Goes
Tuesday Throwdown - something recyled (cereal box)
Critter Sketch - Use two different punches/dies
Cupcake Craft - Layers
Stamp with fun - birthday
Paper Sundaes - Texture


Monday, 4 April 2011

Simply Sassy Tissue Box

Morning Peeps,

Hope all the Mum's got thoroughly spoilt yesterday.  I had a lovely day with flowers, little cupcake truffles, yum, yum and a gift voucher for Top Shop from my daughter and 3 crafting stamps from my Son. Bless him, he reffed a couple of football matches, put his money in the bank and bought his mummy some crafting stamps, isn't that sweet, bless.  Then we all went out to the Harvester for a lovely family meal.  So you can safely say I had a lovely day.

Today for the Simply Sassy Inspiration Blog HERE, I have made a Tissue Box using "Fairy Tale" available from Sugar Nellie at Funky Kits HERE.


The tutorial I followed is from my fabby Teamie Vicky, you can see it HERE.  I adjusted the height of the box by 2 cm.  It fitted my Boots Tissue Box perfectly and also accomodated my square papers that I printed to size, that's the beauty of digital papers.


Just love this Stamp, all that flowing hair and that beautiful face. I have used copics to colour her and prisma's for the shading on the hair.


Here's a picture of the top of the box.  I cut out the middle section with my nesties and also made a frame out of kraft cardstock, again using my nesties,  and edged with vintage photo distress ink. The gorgeous lasercut chipboard flourish is available from Make It Crafty.  Seriously can't get enough of these!


I will be keeping this tissue box and I'm sure I'll be making more of them. 

Ingredients Used:-
Image "Fairy Tale" by Sugar Nellie at Funky Kits HERE
Papers are Vintage Lace from Bearly Mine available HERE
Kraft Cardstock by Bazill
Flowers from Wild Orchid Crafts
Vintage Photo Distress Ink
Pearls and Lace from stash
Martha Stewart Frond Punch

Dont forget to join the Crafts and Me Bloghop with hidden prizes along the way and a £45.00 voucher for the overall winner HERE

I have entered this Tissue Box into the following challenges:-

By the cute and Girly - Cute & Girly  
Sir Stampalot - Ladies Fashion 
I Did It Creations - Anything Goes 
Paper Sundaes - Spring Blosoms 


Monday, 14 February 2011

Some Bunny Loves You

Morning Peeps,

It's Monday, hope you all had a good weekend and it's time for my slot on the Simply Sassy Inspiration Blog, HERE.

I have used my new Go Kreate Frilly No 2 die set to create this shaped easel card, and my new Grand Calibur that I won on the Sugar Nellie competition just before Christmas thanks to you guys.  The image is Bad Hare Day, available right HERE from Funky Kits at Sugar Nellie.


I've used Stormy Sky  and Victorian Velvet Tim Holt Distress ink and used the die as a stencil on the top panel and the two on the bottom, which leaves a clear white edge on the middle layer as a contrast. I hav.e also used the nestie as a stencil on the oval.

I had a little stamp that I purchased from a show a couple of years back, think it was dimentional 4th or something like that and I stamped around the edge of the oval.


I've had the paper ages so really don't know what it was called as it was off cuts that I used to create this easel.

Isn't she gorgeous.


I have again used copics listed below:-

The one without a sticker is the colourless blender.

Materials Used:-

Image by Sugar Nellie Simply Sassy Bad Hare Day available HERE
Go Kreate Die - must use A4 die cutter
Magnolia Doohickey Swirl Die
Nesties
Martha Stewart Butterfly punch
Postcard stamp
Leaf punch

Thanks for popping by and I promise you I'm not back again now until next Monday.

I have entered this card into the following challenges:-

All Things Unity - Favourite Stamp, difficult as I have so many
Baby Bud - Friendship
Paper Sundaes - Use 2 of the following: Flowers, Lace, Distressing and the Colour Pink
Catch the Bug - Different Fold
Phindys Place - Spring is on the way
Stamping with the dragon - Anything Goes
Delightful Sketches - Get punchy
Samuel Taylor - use copics/promarkers
Bunny Zoe - Spring Flowers everywhere
Oh la la - For someone special


Don't forge to enter my candy HERE.

Sunday, 13 February 2011

Stair Step Football Pitch!

Morning Peeps,

I've had a lovely lay in and the boys have gone to football so it's my time to chill and we all know what that mean's to a crafter, lol.

I'm filling in over at the Simply Sassy Inspiration Site HERE as Erica is sick, so get well soon Erica.  If you've not visited for a while you may want to hop over.  There's lots of inspiration, tutorials and also spotlighted Sassy fans, so well worth a peek.  Today's card is one of those we all dread, yep a Boy Card! I was asked to make a 16th Birthday card for a lad, and it came with a recipe of he likes football but doens't have to be a footballer, Fulham colours and must include the badge and had to say Happy Birthday Glenn, ummmmmmmmm.  So here's my interpretation of that:-

A stair step card with a large 16 cut out on my cricut using some football paper from Nitwits. A football pitch cut into 3 sections so from the back you have the centre, the next step is the penalty area finishing on the front step with the  goal and inside the goal with a little help from my son, is  the lad's name GLENN using the Fulham Badge as text, very clever idea, I got there!

I have also included the little Fulham badges to the left and right of his name.

I used this Simply Sassy   "Lost in Thought" which you can purhase HERE from Funky Kits at Sugar Nellie. 

Copics used:-
C8, C7, C6, C4, C3, C2, C1 C00
E13, E11, E00
The green/blue was using Prisma Pencils and I'm sorry I didn't write them down.

I'm glad  to say that the Grandad who bought it for his Grandson was very pleased.

Enjoy the rest of the weekend and I'll be back tomorrow with a nice Girly card.

I have entered this card into the following challenges:-

Catch the bug - A different fold
Little Claires - Anything Goes
Our Creative Corner - Cutting (most elements have been cut out and layered)
Wee Memories - life/living, fun or love theme
Crafty Creations - Use 3 words
Fab n Funky - Use texture (strip of ribbon across the front step)
Craft your passion - Anything Goes
Oh La La - For someone special