Saturday 30 April 2011

Meet Lil Victorian Steampunk Lilith Preview Day 1

Evening Peeps,

I know a second post on a Saturday, whatever next, lol.  Well there is a reason for it..... I was asked a couple of  months back by Kellie if I would guest design for a new release at Tickled Pink Stamps and  well we had to do a little re-scheduling  a long the way, but woo hooooo, we made it and here I am. Today's preview is Lil Victorian Steampunk Lilith.  I can tell you I have had soo much fun with these images, so be sure to check out the previews going on at Tickled Pink Stamps and if you pop on over and leave a comment you could win Lilith .  I will be posting again during the week and joining the blog hop on 7th May, so they don't get rid of me that easily........


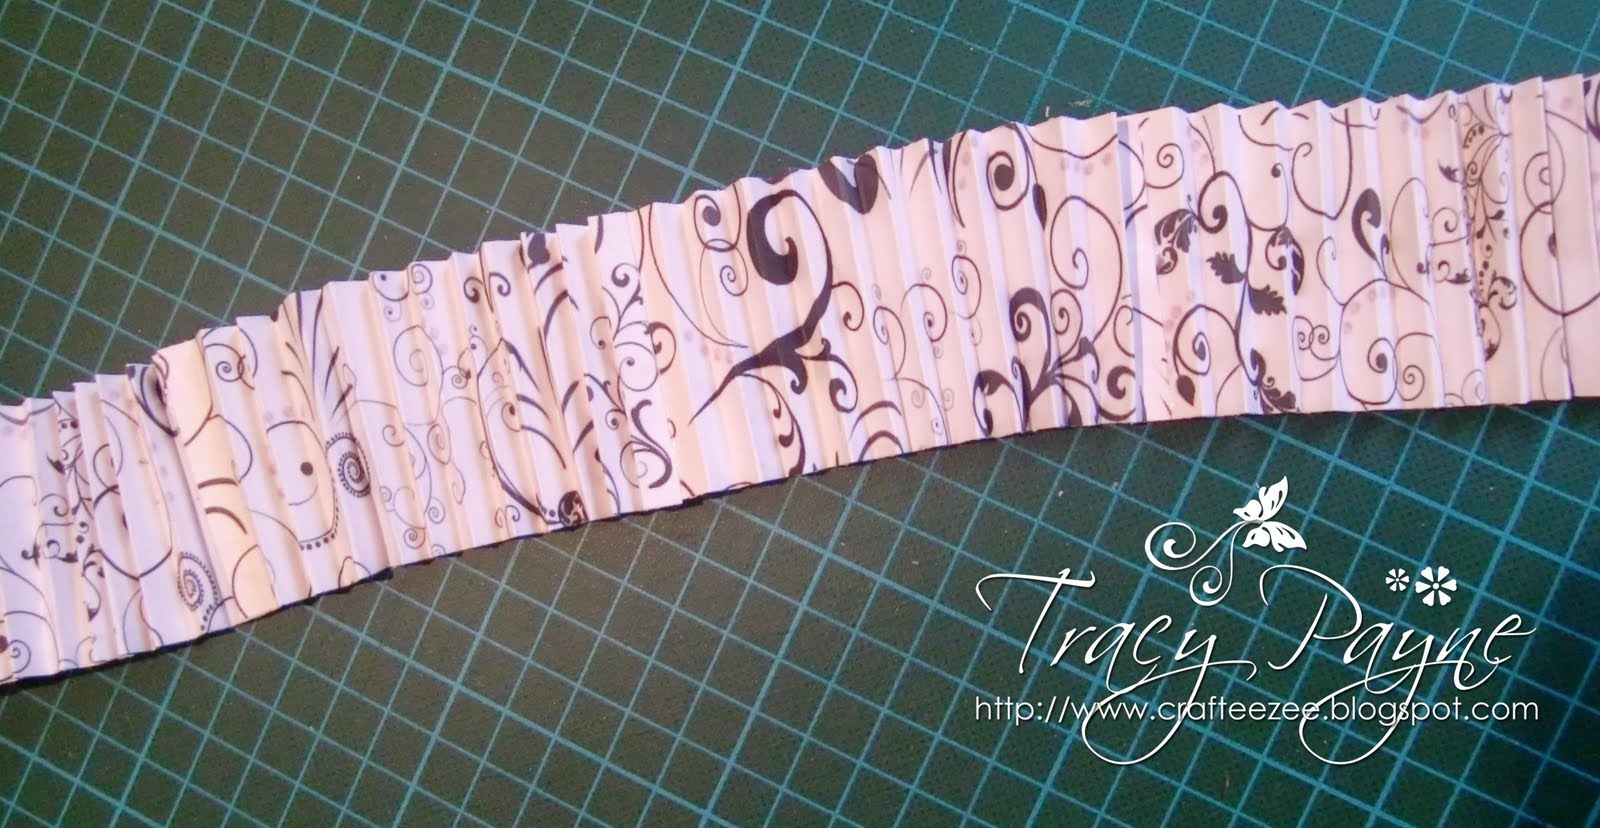
I have used one of my favourite paper brands, Websters,  distressed the edges with vintage photo distress ink and some white acrylic paint.  Really loving my paints at th moment.


Here's Lilith.

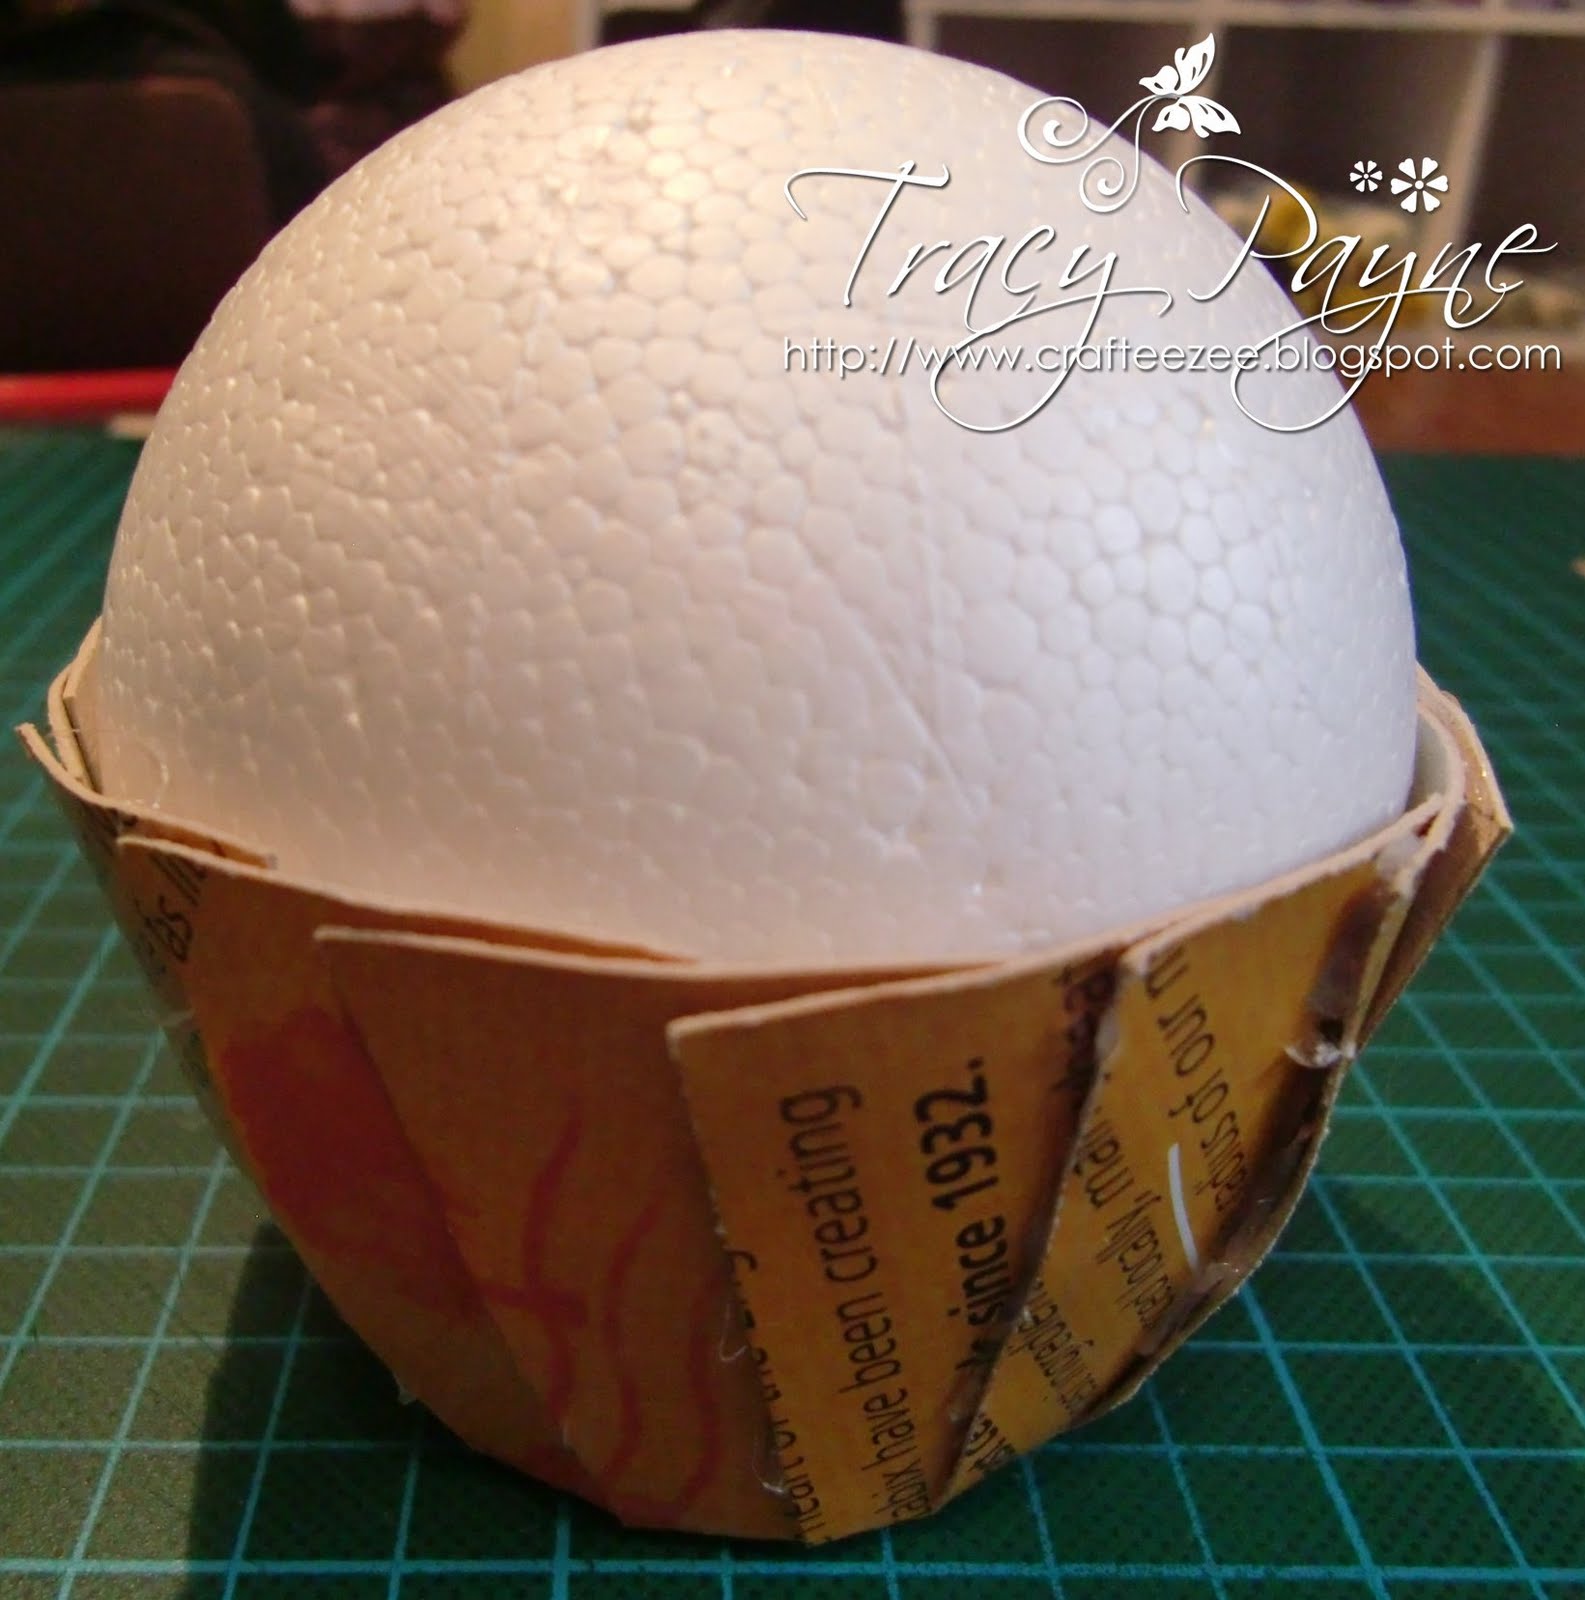
Another favourite of mine is the corrugated card ripped and painted. I have also cut out the flower using a Marianne Design poinsetta die, who said they were only for Chritmas?, and distressed it using Tim Holtz Crackle paint and added a little white acrylic paint here and there.  I have layered this onto a lasercut chipboard cog and added a lasercut chipboard swirly vine, both available from Make It Crafty, god these are just the best! Oh, and I can't forget that little clock in the centre.  Just precious, wish I knew where I got them from.  I know it was at a show a couple of years ago and I have used them sparingly, not wanting to part with them.  So if you know where I can get some more, I'd love to know.


I have coloured up some white seam binding using my distress inks and water and you can see it kind of has a two tone effect.  Love it.  Oops, another cog there on the right hand side and again I have added acrylic paint to it and the odd splash of white acrylic paint.


Oh and I added a Kay and Co butterfly sticker, been in my stash for years, lol.  Popped it onto some cardstock so that I could bend its wings and give it some dimension.

Ingredients:-
Image Lil Victorian Steampunk Lilith by Tickled Pink Stamps HERE
Medium - Copics C7-C00 
Papers by Websters
Corrugated Cardboard
Acrylic white paint
Tim Holtz Distress Crack Paint Weathered Wood
Lace, Pearls Seam Binding, Minature Clcok from stash
Magnolia Doohickey Die
Kay & Co Glittererd Butterfly
Stamped Watch Clock onto accetate
Flowers from wild orchid crafts 
Lasercut Chipboard Cogs and Swirl from Make it crafty HERE 

I am entering this card into the following challenges:-

Crafts 4 Eternity - Anything Goes 
Fashionista Friday - Things with Wings 
Just add ink - Just add a flower 
Papercutz - Anything Goes 
Stamp something - Thing with Wings 
Wags and Whiskers - Use a die/punch 
4 Crafty Chicks - Distressed 
CCEE - Add a butterfly 
Paperplay - Use an item not intended for crafting (corrugated carboard box) 
Southern Girls - Green and Blue 
Scrapbook Sisters - Distress 
Scrap Creations - Flowers 
Stamping Boutique - Winged Things 


Wednesday 27 April 2011

Were Going Vintage at Crafts and Me

Morning Peeps,

Brrrrr, where's the sun gone, lol?  Anyway I'm not complaining really, give's me a day off of walking and more time crafting.

Today the  Crafts and Me Challenge has been chosen by the very talented Angela and Angela would love to see Distressing/Vintage Style.  So this can be ripped papers, old photo's, however you interpret this theme.

I have used one of the Crafty Individuals Stamps from Crafts and Me.  Such a beautiful face:-


Ingredients:-

Stamp CI-101by Crafty Individuals available at Crafts and Me HERE
Corner Stamps, Film Strip and Stamp on accetate are all Tim Holtz
Corrugated card painted with acrylic white paint
Cogs are laserchip availabe from Make It Crafty and now Quixotic Paperie in the UK 
Captured in Vintage sentiment is a freebie from BizzyBecs 
Lace, Doily, Bakers Twine & flowers from stash

I'd like to enter this card into the following challenges:-

Partytime Tuesday - Anything Goes 
Paper Romance - Use a tag 
Paper Crafting Journey - Use a tag
Creative Craft - Recycled (cardboard box painted with acrylic paint)
Alys Sunday Challenge - Twine
Stamptacular - Layers, umm not sure how many layers I have here, think about 7
Moving Along With The Times - Recycle (cardboard box painted with acrylic paint)
Simon Says Stamp - Anything Goes 

Tuesday 26 April 2011

Cute Little Baby Carriage

Morning Peeps,

Yes it's my busy week and I'm back again already.  We are still taking advantage of the glorious English weather and we went for a walk on Sunday by the canal for 2 and a half miles.  Today we went to Ashridge and did a 4 and a half mile walk.  I'm hoping that tomorrow won't be a 6 and a half mile one, lol.  My legs and bottom ache, and believe me OH does not know as many shortcuts as he thinks he does.  Still I need the exercise and it was so nice to see so many people out and about.

Today's challenge at Bearly Mine Designs is "Babies" and I decided to make a little baby carriage.


I have used the paper from Extreme Designer Vol III as I liked the tiny print.  I have used nesties to create the wheels and the cogs are laserchip Cogs from Make It Crafty and now also available at Quixotic Paperie.


The image is by Magnolia and I have again attempted distress inks.  A bit more practice still needed I know. I have added pink netting inside the pram to raise up the sleeping bambino.


Ingredients:-

Papers by Bearly Mine Extreme Designer Vol III CD
Bazill Cardstock
Medium Distress Inks
Cogs painted with pink acrylic paint available from Make It Crafty and Quixotic Paperie
Nesties
Cuttlebug Embossing Foler
Flowers from Wild Orchid Crafts
Lace and Brads from Stash

I would like to enter my baby carriage into the following challenges:-

Lexis - Anything but a card
Make it Monday - Anything Goes
My Partner In Crafting Crime - Photo Inspiration (I have chosen colours)
Ellephantastic - Anything but Square or Rectangle
Crafty Anns - Fancy Folds
Delicious Doodles - Anything Goes
Cooking it up with Katie - Flowers, pink, for a lady (mine's a little lady)

Monday 25 April 2011

Lessons Learned

Morning Peeps,

I've been wanting to play around with distress inks for sometime so I bought some small brushes and started to have a play and learnt some lessons along the way. One of the  main differences I found with using distress inks against copics is that its difficult to create the creases in the clothes like you can with copics.  However I do still love my copics.

This super Sassy Girl is called, "Rapunzel", and she started off being lilac and turquoise blue but I added some vintage photo to the edges of her tights forgetting that I was meant to go and work on another part of the image allowing the tights to dry first, so after adding the vintage photo they kind of blended and I ended up with green tights, lol. Good job I like lilac and green.

After completing her I decided to cut her out in an oval shape using my nesties and I placed some post it notes over the nestie and image to keep the nestie in place.  Don't know about you but I have had countless times of the nestie not cutting where I wanted it too on my bigshot and on the Grand Calibur.  Only I had a shim on it for embossing and I forgot to remove it, so my image ended up with the post it notes being embossed onto the image.  So in short these are my lessons learnt:-

1. Don't try out a new tecnique for a DT card when you don't have enough time to do another in case it goes wrong... Oops!
1. Wait for the area to dry before applying a new colour
2. Don't leave the shim in the bigshot

I followed the sketch over at The Sugar Bowl and here's how it ended up.


Don't look too closely, lol.  I need time to practice.

By the way the gorgeous laserchip flourish corner and butterfy are now available at Quixotic Paperie in the UK as well as Make It Crafty.  So all those gorgeous laserchips you have seen me use are right on your doorstep now. 


Ingredients:-

Image is "Rapunzel" available from Funky Kits HERE
Check paper is available from Nitwits Digital Downloads
Martha Stewart Punch
Flowers are from Bizzy Becs
Magnolia Doohickey Die
Laserchip Corner painted with acrylic paint from Make It Crafty and for you UK Girlies Quixotic Paperie are also now stocking the Make It Crafty Rubber Stamps and Lasercut Chipboard Embellishments
Cuttlebug Embossing Foler
Bazill Cardstock & Pearls from stash

I have entered this card into the following challenges:-

The Sugar Bowl - Sketch
Card Cupids - Punches
CD Sunday - Butterfies and something from a CD (papers)
Paper Sundaes - Use at least 2 from: Sparkle, Pearls, Die Cuts and the Colour Yellow
Sparkles Forum - Anything Goes
Stamptacular - At least 5 layers
A Gem of a challenge - Pearls and/or swirls
2 Sisters - Photo inspiration (I took butterfly and the colour purple)
Our Craft Lounge - Punches
Sassy Studio Designs - Use Pastels
Simon Says - Embossing
Creative Craft - Embossing
Ladybug Crafts - Anything Goes
Top Tip Tuesday - Open

Can I ask a favour.  I have entered a card into the Magnolia-licious Highlights, no. 94 for category #1 Full Size image.  If you like my card could you vote for me.  You can email your vote to Suzanne Dean on sjdean0574@yahoo.com

Thank you.  


Thursday 21 April 2011

Brewing a Treat, Cupcake Tutorial

Morning Peeps,

If your looking for the coming Zoe from Make It Crafty and Mo from Mo's Digital Pencil scroll down one or click HERE.

Wow do I have a sweet treat for you today, and the best of it is it's calorie freeeeeeeeee! Whilst attending the craft show at Alexandra Palace recently with my sister and niece  we saw one of these cupcakes and my sister said, you could make one of these. Enough said, so for my tutorial on the simply sassy blog today I thought I'd show you, and I might add this is the first time I have made one, lol, how to make the cupcake and what better image to add to the box than the Witch's Cauldron as she is making a special calorie free cupcake brew, lol.  We all need one of these and this one I am giving to my Sister for her birthday on Saturday, her lounge is black and white, so this will fit in perfectly!

Well, it's a long post so grab a cofee and off we go............ You will need some strong card, I used the back of a cereal box, normal cardstock, papers, glue, a polystyrene ball, and whatever you want to use to decorate it, ribbon, flowers, stickles, glamour dust, perfect pearls, and accetate if you want to make the box. It's really up to you.

This is what we are going to make:-


This is what you will need:-

Strong cardstock for your base (I used a cereal box)
Paper for the cupcake case, 2 x 12" strips
Ribbon x two colours x 1 metre each or thereabouts
I polystyrene ball
Glue 
Elastic Band
Scissors 
Accetate x 4 pieces 12.5 x 
Cardstock and Punchfor the box 
Decoration: flowers, perfect pearls, ribbon, lace, whatever you fancy
Your choice of image, mine is Witches Cauldron by Simply Sassy available HERE


First cut a 6 inch circle out of your strong cardstock (this is my cereal box).  Mark out a 2 inch circle in the middle and then mark out 16 even wedges.

Cut each wedge up to the outside of the 2 inch circle.

Place the ball inside the cupcake.  Put an elastic band around it and glue the flaps.  I used a hot glue gun but any glue will suffice, you'll just have to be patient and let it dry.

This is how it should look. Then glue your ball into the bottom of the cup.

If you are using 12 x 12 paper, cut two two inch strips.  I used digital paper printed 6 x 6, so I cut 4.  Then glue all the ends to together and make a circle.

It should look like this.

Cup around your cupcake base and glue at the top and at the bottom.

Cut out a circle big enough to cover the bottom and stick down.  I traced around my glue bottle.

Now onto the decoration.  You can ruffle your ribbon two ways.  Loosen the threads at the bottom and pick out a couple of threads from the middle section and pull.
Secondly, do a running stitch down the middle of the ribbon and when you get to the end pull the thread and ruffle the ribbon and secure.

This is your icing.  Now time to decorate.

A layer of lace and then white icing.

I airbrushed a few flowers to make them black.

Another layer of black icing.

I then added some liquid pearls, glamour dust and for the black cherry, I rolled up some airdray clay, painted it white with some acrylic paint and then airbrushed it black and add some more glamour dust as all cupcakes need a sprinkling of sparkly stuff don't they.


If you want to make a box, then read on.
You need to cut two squares of 7 x 7 cardstock and score 1 inch each side. Then cut out the triangles marked with the dashes.

Glue the edges to the inside of the box.

Once you have two completed.  You will need 4 sheets of accetate, 12.5 cm by 15.5cm


I cut 4 x 1.75  inch strips of cardstock and and punched both sides.  You will need a total of 4 x 15.5" in length pieces. I then scored them down the middle.

Glue the accetate pieces to the punched edges as shown below.

Then place inside the cardstock base and glue all the way round.

Pop the lid on and decorate as required. Note I didn't glue the lid down so that you can take the cupcake out and whilst it lives inside the box it remains dust free.

And it wouln't be complete without your image.  Here is the Simply Sassy Witches Cauldron.  Hasn't she done well brewing up her snazzy black and white cupcake.


Here's a picture of the lid.


Hope you've enjoyed the tutorial.

Challenges:-

ABC Challenge - S for Sparkle (lots of glamour dust on my cake)
Creative Craft World - Recyle something (cereal box)
Freshly Brewed - Sparkle and Shine
Your next stamp - texture
A spoonful of sugar - Celebration (this is for my sister's birthday on Saturday)
Ladybug Crafts - Anything Goes
Tuesday Throwdown - something recyled (cereal box)
Critter Sketch - Use two different punches/dies
Cupcake Craft - Layers
Stamp with fun - birthday
Paper Sundaes - Texture


Mo & Zee's Carnival Blog Hop


Clowns, Fairy floss, sticky fingers, squeals of delight and of course complaints of sore feet near the end of the day... Where are we?


THE CARNIVAL!!

Hopefully you have just hopped on over from Jen's Blog.  If you've just popped on by to say g’day and want to join us on the super carnival hop then you’ll want to START HERE 


Zoe from Make it Crafty and Mo from Mo’s Digital Pencil, came together to share the delight and fun of The Carnival. To celebrate - the two fabulously talented teams have come together for a massive blog hop to offer you plenty of inspiration when playing with these images.


Along the way you will find balloons with a letter in them. Write down the letters as you go because at the very end we want you to guess what the saying is!

There will be THREE grand prizes randomly drawn from the correct answers PLUS there will be hidden prizes along the way so make sure you leave some love as you hop along!

Now we know this is a super big hop, but we wanted to make sure you would get LOTS of inspiration! The hop will be open until the 28thApril so you will have plenty of time to come back each day with a cuppa to soak it all up! (Just don’t lose the letters you have been collecting!)

We would like to thank our fabulous sponsors, Mo’s Digital Pencil, Make it Crafty, Stamping Bella and Quixotic Paperie for providing the fabulous prizes for this grand carnival hop!

 I have used the Candy Cart from Make It Crafty and Angelina's Balloon from Mo's Store. The sky has been drawn using our Teamie Annika's fab tutorial here.  I probably got a little carried away, lol.


Here's a close up of Angelina's Balloons and the Make It Crafty Candy Cart.

And those gorgeous leaf flourishes available from Make It Crafty.


Make sure you leave a comment for a ‘possible’ chance at winning some hidden treasure and don't forget to note my letter "A".


And...... before you go Mo is offering for the duration of the hop the following image for $1.  All proceeds will be split between the Make a Wish Foundation in the US and the UK.


Ingredients:-
Image Candy Cart by Make It Crafty HERE
Image Angelina's Balloon from Mo's Digital Pencial HERE
Lasercut Flourishes from Make It Crafty HERE
Tim Holtz Crackle Paint
Tim Holtz Walnut Stain Distress Ink 
Medium - Copics 
Paper by Daisy D's, had it years 
Magnolia Doohickey Die and Tag Die
Sentiment Magnolia
Flowers from Wild Orchid Craft 
Lace, Ribbon, Pearls from Stash and corrugated card from a box
White Acrylic paint 

I'd like to enter my card into the following challenges:-

AiFactory - Flowers in bloom
Charisma - Make you smile or laugh (think this image does just that)
Colour Create - Pink/Blue/Brown


Next on the hop is the fabulous Maria. Have fun and Happy Easter!


Monday 18 April 2011

Oh I Say, Oh La La

Morning Peeps,

I do hope you enjoyed the Simply Sassy Hop yesterday and if you haven't yet been on it you have until tomorrow evening to complete it, and as there are only 6 of us, its a real quick one!

It't my turn for inspiration on the Sugar Nellie Simply Sassy Blog and it's hard to top the amazing creations that the DT put on for you yesterday but here goes...... As you will see I'm back to my Tracy style, lots of everything, lol......


This fabby stamp I think is my favourite in this set and I can see her on a forthcoming Anniversary card, but she screams Paris and Love  to me so I have gone with the Paris theme and added an Eiffel Tower stamp on accetate in the background and also a film strip, love this as an embellishment, oh and a little postcard, cos although she lives in France she is on holiday in Grand Paris.


I have coloured her using all the "C's" Copics, and the flower using G82, G40 and V17, V15, V12

It's my turn for the tutorial on Thursday and I have a real treat for you, calorie free of course, so don't forget to pop back.

Ingredients:-
Image "Oh La La" from Sugar Nellie at Funky Kits HERE
Papers from Bearly Mine Vintage collection HERE
Corrugated Card oval stamped with a Tim Holtz Stamp and middle panel covered with white acrylic paint
Heart Doily, seam binding, lace and Pearls from stash
Flowers from Wild Orchid Crafts and 99p Shop
Film Strip and Eiffel Tower Stamp by Tim Holtz
Butterflies - Martha Stewart Punch
Flourishes are lasercut chipboard  available from Make It Crafty and covered with Tim Holtz Crackle Paint
Distressed with Tim Holtz Vintage Photo
Star Dust Stickles

I have entered this card into the following challenges:-

Cupcake Craft - Lots of Layers
Make It Monday - Anything Goes 
One stitch at a time - Make It Sassy 
Let's Ink It up - Stitching 
Paper Sundaes - Texture  (corrugated card and acrylic paint)
Pile it on - Use a rubber stamp 
A gem of a challenge - Pearls and Swirls 
2 Sisters - Ribbon, Pearls and Flowers 


Sunday 17 April 2011

By Jove I Think I've Done It!

Welcome Peeps to the Simply Sassy Release 6 Blog Hop,

Woo Hoo, we all love the Sassy Girls don't we and Release 6 will certainly get your creative juices flowing.  I have used "Carnival Balloon" from Funky Kits and paired her with the Carousel from Make It Crafty.  I can see that she can be used for so many ocassion cards so I'm sure she'll be a favourite.  Now if you've arrived from Autumn's blog, then your on the right track, if not hop on over HERE and start at the beginning.


Well if your a follower of mine you'll know that I love my embellishments and really struggle to create something clean and simple but by jove I think I've done it here, well it's probably the closest I'll ever get to it.  
I have stitched the panels using my sewing machine and coloured my gorgeous images using copics and a few prisma's and added a bow, voila done.

Next on the hop is Kathrin, have fun and I'll see you tomorrow for some more Sassy inpsiration.

Recipe:-
Carnival Balloon image from Sugar Nellie at Funky Kits HERE
Carousel from Make It Crafty HERE and soon to be available in rubber at Quixotic Paperie HERE
Medium Copics/prismas 
Papers are from Nitwits Bigtop collection
Cardstock is Bazill
Star Dust Stickles 

I have entered this card into the following challenges:-
Delicious Doodles - All stitched Up
Fussy and Fancy - Card for a child
Inspire Me Fridays - Anything Goes
Outlawz - Give your image some background
Little Miss Muffett - Glitter and Shine (hopefully my gold carousel is shiny and I glittered the flying ribbons)
Simon Says Stamp - Card for a child
Digital Tuesday - Little Women

When you've finished the hop, just click on the Funky Kits Badge below to take advantage of the special hop price of buying all of  Release 6 for the price of 5, for the duration of the hop which ends on Tuesday.