Now I know everyone has started off by saying how nervous they are doing tutorials, and I'm no exception, so take it easy on me.
I thought I'd show you how I stamp with shrink plastic. You should always use stazon ink when stamping on shiny or slippery surfaces so this is a must for shrink plastic.
Above is what you will need. StazOn ink, your stamp, some shrink plastic, hole punch if fixing as a charm, file and your heat gun and of course whatever colouring medium you are using. I have previously used copics, chalks and pencils. I have also shrunk it without using colours and added different colour glitters, which worked well with shrunk christmas baubles. Will you look at my heat gun, I decided it looked boring in white so I added some alcohol ink to make it more exciting. Although it's starting to wear off on the handle, that's down to how much I use it, lol.
Using your StazOn ink stamp your image onto the shrink plastic
Cut the image out or into the shape you require. I then flipped over to the back and gave it a little file. This just helps the colour medium grip onto the surface, so on the back where you file is where you will colour.
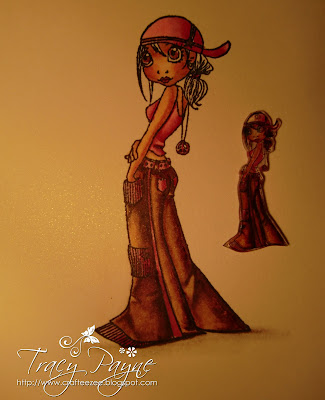
I wanted my shrinkie to match my main image of the card. When you heat the shrink plastic the heat intensifies the colour so you can see here I have had to colour the shrink plastic a few shades lighter. I used copics and prismas to colour.
I am going to add her as a charm so if you are doing this don't forget to punch a hole somewhere so you can add your jump ring to afix to your chain.
I used some tweezers to try and keep her on the mat as once you start the heatgun if your image is small it may want to blow away.
Move the heat gun around and you will notice that your image will curl up. This is correct. It will probably curl right up into a ball and then it will then start to uncurl.
As soon as it straightens again I usually put something heavy onto it to make it completely flat as it cools very quickly and becomes hard and you don't want a banana shaped image, well I don't think you do, lol. I used my acrylic block, but it could be whatever you have handy, a wooden stamp etc.
I know my photo is a little organey, please tell my husband I neet an ott light or daylight saving lamp, lol. Anyhow you can now see that after heating the colour intensified and it now matches my main image.
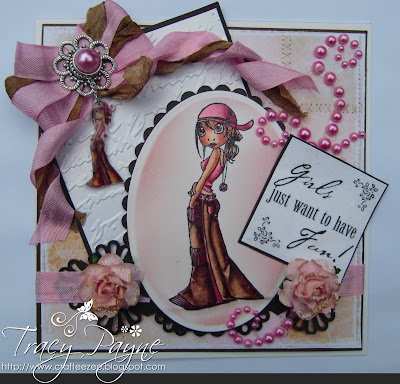
And here's a reminder of the finished card, Skater Girl and mini Skater Girl.
I hope this tutorial has been of help.
See you Saturday.


24 comments:
Hi Tracy This is gorgeous fantastic colours and beautiful image, I just bought the daylight bulb and fittedan into the lamp I had in my room much cheaper than buying the whole lamp, it lights up the whole room, £ 4.99 for the bulb.
Chris x
Stunning card hun...luv the colour combo, thanks for the tutorial it was very helpful :D
xx Lizzy xx :)
Oh excellent tutoriel, thank you very much !
xx
Просто супер!!! Красота!!! Спасибо за МК! )
Hi Tracy..
Great tut, but the card os just beautiful..
Huggies Angel
Hi Tracy, wow this is so cute! I love this shrink stuff, used it myself on a Valentine card the other day! Your card is just so full of detail, love that pearl swirl and the double bow, wow! HUgs, Frea
Ohhhh, its a verry verry great card and all the lovely details, wow.
Have a nice day,
Simi
Great tutorial Tracey and an amazing card just beautiful!! Chanelle xxx
Fabulous tutorial that should help anyone whos a little scared of trying shrinking plastic. Your card is stunning, and its so pretty to. With hugs Shirleyxxx
E' fantastica questa idea! Grazie mille del tutorial.
A beautiful card and charm and a great tutorial! May I assume that you stamp on the front but colour on the back because that is the side you sanded?
Hugs, Lesley
These are great tips!!...Your card is so pretty, too:)...Thanks for sharing a really useful technique!!
xoxo
Very helpful & clear tutorial - especially for a beginner. I love how you got the colours matched with the image on the card so well too. Your heat gun is rather special.
Paula (PEP)
wow great....i try it....thanks.....
Hugs
Judith
thanks Tracy i really think I may pluck up the courage to have another go at shrink plastic...what a mess I made of my first attmept...so thank you for the tutorial....great card such a talent hugs Margaret
Your card is lovely. And I love your tutorial :)). Maybe I will try it out. I do have it all, but never tried it :)).
HUgs Monique
Brilliant tutorial Tracy and a fantastic card. hugs Teresa xx
love it! I am really crazy about shrink plastic, so thanks for showing this!
great tutorial! I'm scared of shrinkies I've only done one!! I think I might have another go now with your tips, thank you x x
fabulous tutorial hun! love the idea of sanding the backside! Fabulous card too! hugs xxoo
Well done you - great tutorial, and your finished card is fab! :o) xx
Great tutorial - love using the same image on the card and as a charm!!
Thanks for sharing!
wahou thanks for this tutorial I love this idea
Fabulous!!! you have done a great work...
Plastic Business Cards
Plastic Card printing
Post a Comment