I have written this tutorial for those wanting to try merging digital images with your existing rubber stamps. I have used Word but the principal should be same with whatever package you are using. Please note all pictures will expand when clicked on.
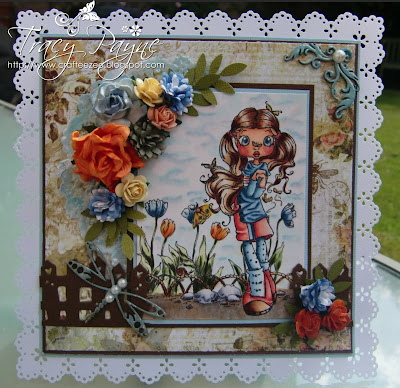
This is the picture we ultimately end up with:-
And this is how we achieve this scene.
In word you have two ways of bringing your image in. Firstly by copying and pasting. Go to where your digital image is saved on your computer and right click. Choose Copy.
Open up a new page in word, right click and choose Paste, or a quick way to do this is to press the control key and "V".
Now your image is on the page you will want to be able to move it around. Right click on your mouse, Choose Text Wrapping and then Square.
OK, now you are free to move your image around the page but you may need to resize. You will see the square around the image. Right click on the top left hand corner of the box and Wthen hold down the left click button on your mouse and move it up or down to resize.
When you think you have it in the right postion print out on paper, not your stamping card. I then put my image against it to see if I have the right height. Adjust as necessary for your image. Once I have it in the right place I need to mark where I will need to stamp my image.
Now you need to get out your stamping card. You may want to test different cards with the inks in your printer. For printing digi's with my HP printer I have to use the cheapest black ink I can find. It is all down to the pigment in the ink. If I use the original ink, then it smudges with my copics. I also set to print on draft but again your printer may be different, so please experiment and don't give up.
Place your draft copy with the mark in position on top of your stamping card. I use a very sharp pencil to go through the marker and pierce the paper and inserting the dot onto the stamping card. This is where I will need to stamp my image.
Stamp your image where you have marked.
Now yo need to mask off your image. You will need a masking tape, I have used woodware, staz on ink, this is important and the only ink you can use on shiny surfaces and of course your choice of image. Stamp out your image using the staz on onto the masing tape/film and cut out.
Match the mask over your stamped image on your cardstock and you are now ready to put the image through the printer to add your digi background.
Remove your mask and you are now ready to colour. Be careful when removing your mask as the printer ink on top of the mask will come off on your hands and you do not want to get this over your image.
And here is my finished card.
Again I have had drawn the clouds and used B91, B000, C1, C3, C00
I have embossed the doily and dragonfly with moonglow embossing ink, so it changes from a blue to a gold colour in the light.
Here is the complete list of copics I have used.
Ingredients:-
Butterfly Girl Image is by Sugar Nellie Simply Sassy HERE
Tulip Garden Digi by Make It Crafty HERE
Lasercut Chipboard Dragonfly and Corner Flourish by Make It Crafty HERE
Papers by Prima
Moonglow Embossing Powder
Martha Stewart Frond Punch and Border Punch
Pearls and Flowers from stash
I hope you have found this tutorial helpful and I look forward to reading your feedback.
I'd like to enter my card into the following challenges:-
Little Miss Muffet - Multiple Images
My Mum's craft shop - Summer
Stampavie & More - Girlie


21 comments:
Hi wow this is such a valuable tutorial ! Thankyou so much I am off to try it out ! Your colouring and layout of this card is totally amazing 1 Just love your blog ;0) Kitty x
fabulous, fabulous FABULOUS tutorial!!! I'm off to get me some backgrounds, so I can have a go!!!
your card is just absolutely beautiful!! I love everything about it!
Paula xxx
Great tutorial Tracy thanks
Thanks for sharing this one with us ! Can not wait to try this one ! Hugs, Marion
Great, thanks for sharing! Your finished card ist fabulous!
Hugs, Alessandra
Fantastic tutorial Tracy, thanks very much. Great finished card too - beautiful colouring.
hugs
Dawn xx
Brilliant tutorial Tracy will give it go in the near future. hugs Shirleyxx
Stunning card by the way.
I heart you! I've been watching your blog for a little while now, but cannot believe how awesome you are! So very talented and SUPER ideas/tips. I've been wanting to do this---and your post has motivated me to try it. :)
Thanks!
Crystal
This is fabulous, the colouring is nice, all is nice !
xxx
GREAT tutorial Tracy and absolutely STUNNING Card! Hugs, Lesley
Hi Tracy, thanks for your lovely comment on my blog. The holly under the ribbon is also ribbon lol. Its organza ribbon with holly along each side. I haven't seen it online, it was from a little sewing shop near me last year. Let me know if you want some and I'll see if they have any left
Claire xx
thanks for the tut and the card is gorgeous!!
Always wondered how to do this. This is a great tutorial Tracy! And what a gorgeous end result, your card is absolutely beautiful! hugs, Angela
THis is awesome, thanks! Hey, do you know if there's anything "wrong" with basically making a rubber stamp into a digital by scanning the image? I'm talking just for personal use, you know, so you can resize a rubber stamp?
Hi Tracy, I have just noticed you have had success over at Bunny Zoe and just wanted to say congratulations and wish you well. Judy x
Just want to say a huge "thank you" for posting this tutorial. I have seen it on some other blogs and whenever I have asked how it was done, I usually got an "it's complicated" or "I just do it in my own way" or even "I will do a tutorial some day on it." So you can imagine how thrilled I was to get this in my email! Thank you again. You have allowed me to really get creative with the digis and my rubber.
Hello Tracy,
Don't know if you are able to get this in the UK but a product by Judi-Kins called Eclipse Tape is great for using with your printer. It's masking paper in a roll with a sticky backing and I use it to do the same thing you do with mixing digi images with rubber stamps. You can use any kind of ink on the mask as it will not rub off, and the printer ink will not rub off it either. One roll lasts quite a long time. Judi-Kins stopped making it for a while but finally this year they found a new manufacturer and it's in stock again all around the US. Here is a link to see what it looks like, TERRIFIC stuff - I don't think I could stamp without it:
http://www.blockheadstamps.com/Craft-Adhesive/Masking-Tape/Eclipse%20Tape/TAPE-46
Your cards are just beautiful!
Regards,
Abbey97
Brilliant card and the tutorial is fantastic.
Thanks for sharing at Little Miss Muffet Challenges.
Hugs Shirley x x.
This is totally gorgeous and thanks so much for this tutorial! I know how to mask, but it had never occurred to me that you could combine stamped and printed images! Wow! Fabulous!
Thanks for joining us at Little Miss Muffet stamps for the multiple images challenge!
Arabella
Neat-O. Thanks for the tips.
Sew Sweet N Crafty
SewSweetNCrafty.blogspot.com
Great tutorial and I love your card too! :D
Post a Comment